

Maybe she’s born with it. Maybe it’s Midjourney.
Your guide to crafting generative AI magic. By: Chelsea Chung.

When it comes to AI image generation, we’ve all started at the same point: clueless.
Getting started can be daunting, but knowledge is power and that’s why you’re here. This article is designed to take you from zero to /imagine as if you’ve been conjuring AI magic this whole time.
She’s creative. She’s fierce. She’s completely fabricated by Midjourney.
AN INTRODUCTION TO MIDJOURNEY
Midjourney is only one of the many tools that exist for creating AI-generated images. It’s often heralded as one of the best, but tools are progressing so quickly that there’s a new kid in town just about every week–as well as continual updates and new features to existing models.
You may have also heard of other popular (and fantastic!) AI image generators like:
DALL-E by OpenAI, the same company behind ChatGPT
Stable Diffusion by Stability AI
Each model has its own pros and cons, and often it comes down to personal preference. There are also varying levels of cost and technical know-how required.
Note: if you are a ChatGPT Plus subscriber, you already have access to DALL-E 3 directly within ChatGPT.
Nonetheless, I have a personal preference for Midjourney because:
I think it produces the most consistently high-quality output.
It gives you 4 alternatives for every prompt.
It allows for a relatively high degree of variation and adaptation without needing to know professional design tools.
It’s frequently updated with new features and constantly getting better.
But there are some barriers:
As of March 2024, it’s only available within an application called Discord, so there’s a little more set-up involved.
The free version no longer exists, so you have to pay to use it. The lowest cost plan is $8-$10/mo (and will be enough to get you started!).
There are some non-intuitive prompting details you need to know–but we’ll cover the basics. They are easy to learn.
GETTING ACCESS TO MIDJOURNEY
Everything you need to know about getting started can be found on the Midjourney website, so I highly recommend bookmarking the Quick Start guide as a resource.
To access Midjourney, you will need to download Discord (I use it on desktop and mobile) and create an account. Discord is a social platform that allows you to join different communities (servers). It gained early traction with gaming communities, but has since expanded into crypto and NFT communities, other tech communities, podcast communities and more.
An important security warning about Discord: it’s often suggested to disable DM capabilities because many scammers will try to interact with you, send you links, etc. via DMs. Unless you know someone personally, don’t trust any of the DM requests you receive! And companies/communities will never DM you directly. However, if you want to use the Midjourney bot via personal DMs (more on this later), then you cannot disable the DM feature. Stay vigilant.
After you’re set-up on Discord, you’ll need to subscribe to the Midjourney subscription plan of your choice. Start with the Basic Plan–you can always upgrade if needed! Then, follow the steps on the Midjourney Quick Start Guide to join the Midjourney server in Discord.
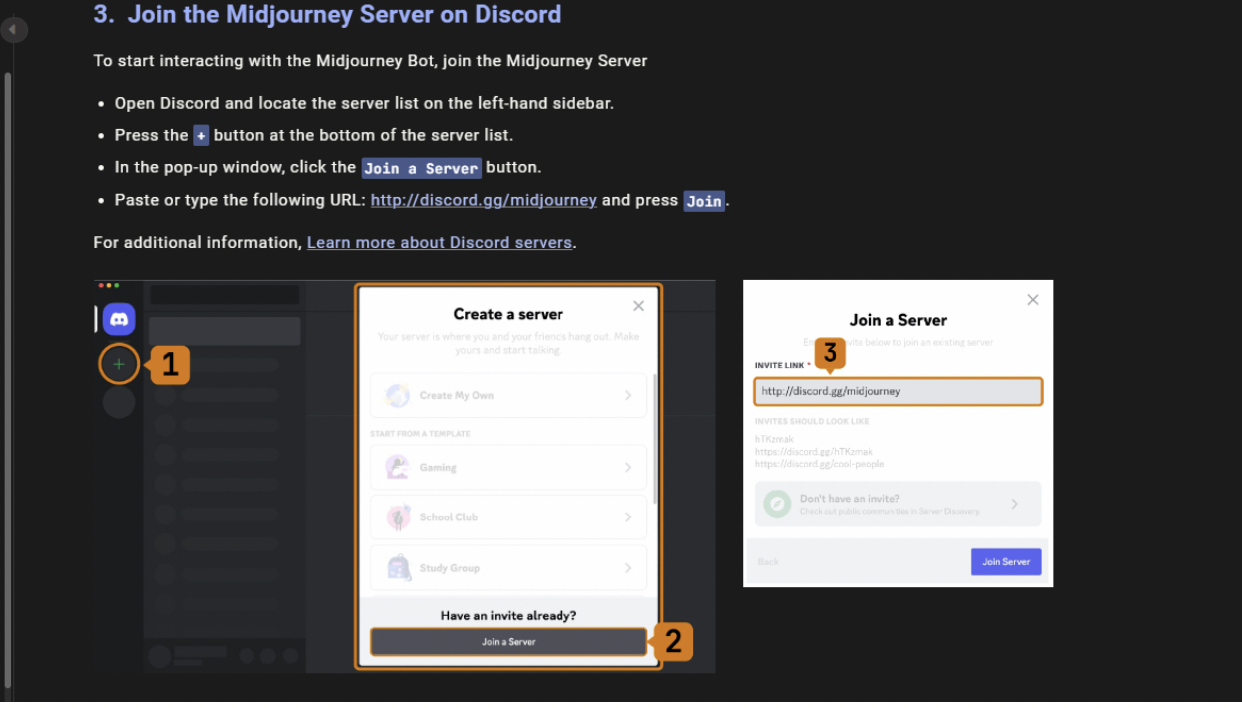
Once you’re in the server and you have an active subscription plan, you can jump into the newbie or general image generation channels within the server to begin creating your images. These channels are PUBLIC with many people generating images at the same time, which means you’ll be seeing prompts and resulting images in real time. This can be a fun way to learn and get inspiration, but it can also become overwhelming and confusing–with your images getting lost in the shuffle.
There is a solution to this: inviting the Midjourney Bot to your own server or DM. While some people set-up their own servers with multiple channels for different themes to organize their creations, I find this to be more work than it’s worth and prefer to work with Midjourney in a private DM. Learn how to set this up here: https://docs.midjourney.com/docs/direct-messages
Just because you use Midjourney in a private DM or private server doesn’t mean that your images are private. They will still show up in the Midjourney showcase unless you set your settings to Stealth Mode, only available to Pro and Mega subscribers. So only generate images you want the public to see!
THE FUN PART: GENERATING IMAGES
While there are several commands to interact with the Midjourney Bot to generate images, change settings, view account info, etc., the most important command you need to know is: /imagine.
Before you are able to create any image, you have to type /imagine in the message bar to begin your prompt.
And open sesame! An infinite world of creative possibility awaits.
It’s time to craft your prompt. Prompt engineering is a mysterious balance of art and science, and sometimes what works best for one model doesn’t always work for another. You’ll improve over time as you learn specific phrases and words that give you your desired output, but sometimes you’ll want to throw your computer out the window as your try, try, try to get the perfect image. I think the best approach is to surrender to the process and enjoy the journey–you’ll be pleasantly surprised along the way.
Nonetheless, there are some prompting best practices to getting what you want:
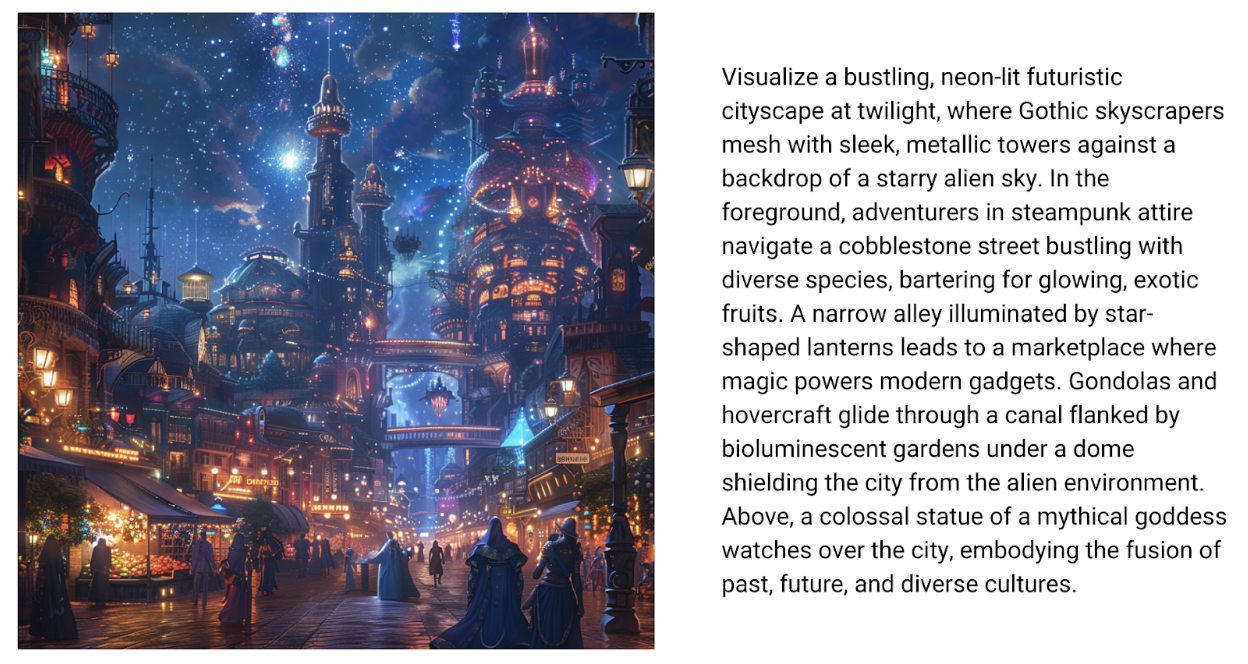
Be specific: You really do get what you ask for. If you want something to be dark and dramatic, say it. If you want a cartoon, ask for a cartoon. Use adjectives and be evocative–for example, “mystical feline spirit” will yield very different results than “cat.”

Channel your inner artist: Consider composition, lighting, and style when crafting your prompt. Think "baroque portrait with dramatic chiaroscuro lighting" or ask for a photo shot by a specific camera with specific settings. AI understands design speak, so play around with it.

Be clear and concise: While being specific is important, clarity and brevity can help the AI understand your request without getting confused by unnecessary details. Know that models can’t focus on too many things at once, so try to keep it focused on what you really want to achieve. Or not! Go crazy and see what happens (as illustrated below). 😉
Use references: Stuck for inspiration? Include references to existing art, movies, or even historical periods. "A landscape in the style of Van Gogh's Starry Night" sets a clear visual direction.

Iterate and refine: Don’t expect to get the perfect response on your first try. It often takes several iterations and slight modifications of your prompt to get the desired outcome.
Learn from others: Look at how experienced users craft their prompts. Many communities and forums share tips and successful prompts, which can provide valuable insights and inspiration for your own queries.
There are also a couple of other commands I use on occasion:
/describe: upload an image or paste a link to an image and Midjourney will provide 4 sample prompts based on that image. This is helpful if there’s an image you love but you don’t know how to achieve a similar look.
/blend: allows you to blend together up to 4 images.
What happens when we blend these 2 lovely ladies?

Wait for it…
…
…

Okay, I LOVE this.
USING PARAMETERS TO FINE TUNE
Midjourney describes parameters as “options added to a prompt that change how an image generates.” There are over 15 parameters that can influence the output, including things like changing the aspect ratio of your image, applying a specific Midjourney style, negative prompts and more. You apply a parameter at the end of your prompt by adding a double-dash: --<parameter name> <parameter detail>
Let’s look at some examples.
Aspect ratio: this changes the dimensions of your image. Midjourney defaults to square (1:1), but you can request 9:16, 2:3, etc. Example: aerial shot of Coachella music festival at sunset, lit up ferris wheel, busy crowds --ar 16:9

No: this is a negative prompt to make sure something does not appear in the generation. Example: fruit basket --no apples, bananas, oranges.

Look carefully and you’ll see some oddities–kiwi confusion and blueberry grapes. Remember: keep iterating!
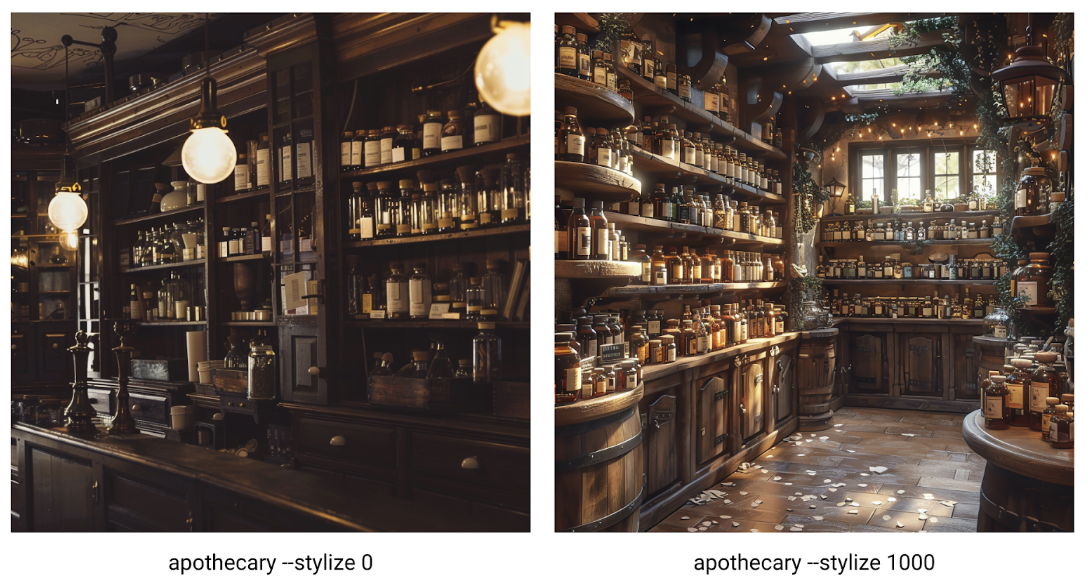
Stylize: sometimes Midjourney can be a little too much and give you something over the top when you want it more simplistic or less refined. One way to achieve this can be language in your prompt–saying things “simple,” “clean,” “minimal,” etc. But you can also set a --stylize number between 0-1000, with 0 being the least and 1000 being the most. (Note: you can also shorthand --stylize to --s)
UNDERSTANDING THE OUTPUT
Now that you’re a prompting magician, let’s explore the output and ways you can iterate. For every /imagine prompt you enter, Midjourney will output 4 alternatives and 2 rows of buttons.
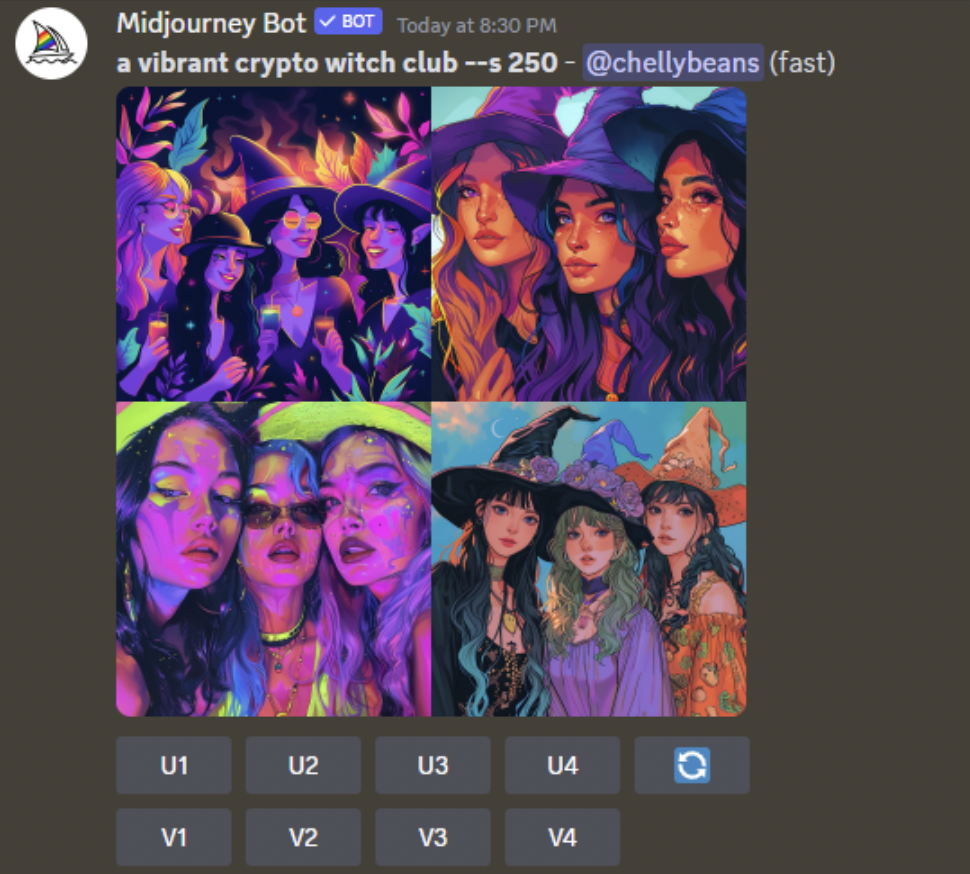
1= top left
2 = top right
3 = bottom left
4 = bottom right
U stands for upscale, which means you want to isolate and enlarge one of the images.
V stands for vary, which means you want to see variations of one of the images.
You can click more than one button to upscale or vary any or all images. The blue circular button generates 4 new images of the same prompt.
If I click “U3,” I get an enlarged version of that image with even more options–allowing me to upscale (enlarge, add more detail) even further and another opportunity to vary (either subtle, strong, or even a specific region of the image). I can also zoom out if I want to create more of a scene. Finally, the blue arrows let me pan in a certain direction to extend the image. Again, you can select multiple buttons (but only 1 will be applied at a time).

Now that I have my isolated and upscaled image (#3), I want to zoom out, so I click Zoom Out 2x… and voila: BADDIES!

Because I can select multiple buttons, I can also try varying image #3 to see what else Midjourney will come up with. In this example, I chose to “vary strong,” which means the differences will be stronger than if I selected “vary subtle.” Now I have a new set of 4 images from which to choose. I can continue varying, upscaling, zooming, panning, etc. until I find the image I like!
BRINGING AWARENESS TO AI BIAS
Now, there is one thing we have to discuss, and that’s AI bias.
AI amplifies the existing biases of society. An AI model is trained by feeding it lots and lots of information and images that already exist. For example, if the AI model is only trained on images of orange cats, the model will think that all cats are orange.
Unfortunately, so much of the media and public content that has been used to train AI models contains societal biases. As a result, AI models have a tendency to represent women as young, white, thin and “beautiful” by narrow standards. As much as I love our witches above, we can see such biases come into play.
And the biases continue in even more subtle ways. For example, I recently attended an AI in Healthcare conference where a panelist discussed a review of AI images generated with the word “autism”--which returned mostly images of white males under the age of 30, none of which were smiling.
We have to be aware of the tendency toward bias so that we can bring more intentionality into our prompts and ensure we’re contributing to generative output that reflects a heightened era of consciousness. Through our interactions, generations and reinforcements, we can provide patterns and feedback that will reduce bias in future updates.
So–back to our coven: with the awareness of bias, I can be straightforward about the witches I want to see.

“A vibrant crypto witch club of multiracial witches.” Bibbidi bobbidi BOOM!
We’ve only scratched the surface of what’s possible with generative AI tools, but that’s all that’s needed to get started. The tech will continue its rapid evolution, so the time is now to start weaving your magic!
ABOUT THE AUTHOR

Chelsea Chung is is our Resident Witch of Vibes and Senior Strategic Advisor at World of Women — covering branding, marketing, NFTs, and empowerment. She is based in Minneapolis, Minnesota.
Follow Chelsea on Twitter here and join our Crypto Witch Club community to connect with her and fellow Resident Witches and community members.

WANT MORE?
We know money has magical powers. Crypto Witches harness our power through self custody, collective ownership, and financial independence. Join the club to connect with others also demystifying their financial future.
Join the Crypto Witch Club Community
Follow Crypto Witch Club on Twitter
Sign up for the Crypto Witch Club newsletter to be the first to get notified of new content and free guides👇👇👇